


 Français
 Русский
 Español
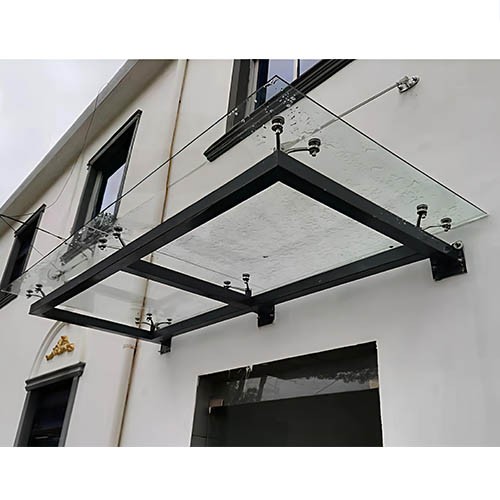
A tension rod system is a structural steel framework of pre-tensioned stainless steel rods that supports glass in point-supported curtain walls, canopies, and glass facades. It transfers glass loads and wind forces to the main structure through tension, keeping the glass visually unobstructed. Installing one correctly is what separates a safe, flat facade from one that sags, rattles, or fails under load.
This guide walks through the components, tools, and a step-by-step installation sequence for tension rod systems, plus the mistakes that cause problems on site.
What a Tension Rod System Is Made Of
Before installing, know the parts you are handling. A typical tension rod system consists of:
- Stainless steel rods — the tension members that form the support web, commonly 12–16 mm diameter depending on span and load.
- Fork end connectors and terminals — the fittings that join rods to brackets and anchor points.
- A tensioning mechanism (turnbuckle or threaded adjuster) — used to apply and calibrate tension.
- Support brackets and arms — the hardware nodes that clamp or hold the glass connection points.
- Anchor plates or embedded parts — the fixed points bolted to the main structural steel or concrete.
All load-bearing components should be stainless steel — 316 grade for coastal, poolside, or industrial exposure, 304 for interior and low-corrosion environments.
Tools and Site Preparation
- Tensioning equipment (turnbuckle wrench / hydraulic or manual tensioner)
- Torque wrench
- Laser level for node alignment
- Spirit level, tape measure, chalk line
- Fork-end spanners and Allen keys
- Safety equipment and working-at-height access
Confirm the structural drawings and anchor locations before starting. The installation sequence matters — tension applied in the wrong order can bow the frame or overstress a single rod.
Step-by-Step Installation
Step 1: Check and Prepare All Components
Inspect every rod, connector, and bracket for damage before installation. Damaged components must not be used. Lay out the system according to the manufacturer’s assembly instructions so the sequence is clear.
Step 2: Establish Anchor Points and Pre-Tension the Main Grid
Fix the anchor plates to the main structural steel or embedded parts at the positions shown on the drawings. Connect the stainless steel rods to their designated positions and pre-tension the main grid first. Use the tensioning equipment to straighten and calibrate the rigging so the load-bearing web forms a flat, even spatial plane before the glass is fitted.
Step 3: Position the Hardware Nodes
Lock the support brackets onto the tension rod intersections, then adjust the horizontal and vertical planes of the arms using a laser level. Accurate node positioning at this stage is what keeps the finished glass surface flat.
Step 4: Connect Rods and Apply Final Tension
Connect the fork end connectors and terminals, then apply tension evenly from both ends using the tensioning mechanism. Tighten to the specified torque — do not overtighten, and do not rely on manual pulling. Even, calibrated tension across all rods is essential.
Step 5: Verify Alignment and Fix the Glass
Re-check the flatness of the web and the level of every node before fitting the glass. Once the facade is assembled, inspect the system and schedule periodic checks, especially for tension loss over time.
Common Installation Mistakes
- Tensioning in the wrong order — always pre-tension the main grid before nodes and before glass; skipping this bows the frame.
- Uneven tension across rods — calibrate each rod to spec rather than tightening one hard.
- Overtightening the turnbuckle — overstress cracks fittings; follow the specified torque.
- Using the wrong stainless grade — 304 fails fast in coastal or poolside environments; use 316 there.
- Skipping component inspection — damaged rods or connectors must be replaced, never reused.
Compliance and Safety
Installation must follow the manufacturer’s instructions and the applicable structural and fire codes. Fork-end connectors should not be subjected to sudden or eccentric loads during handling. On buildings above height thresholds, facade components may also need documented fire-performance and material compliance, so keep records of material grades and any certificates.
Frequently Asked Questions
What size tension rod do I need?
Rod diameter depends on span, glass weight, and wind load — 12–16 mm is typical for facades. A structural engineer sizes the rod from the load case; never guess.
Can I tension the system without special equipment?
No. Proper tensioning needs a calibrated tensioner or torque wrench. Manual pulling produces uneven tension and is a common cause of facade problems.
Should I use 304 or 316 stainless steel?
Use 316 for coastal, poolside, or industrial exposure; 304 is fine for interior and low-corrosion projects. Grade choice affects long-term corrosion resistance, not just appearance.
Get the Right Hardware for Your Tension Rod System
Alongside tension rods, point-supported facades can use fins or spiders; see our glass fin vs spider system guide for a structural comparison of these alternative support methods.
Trilonum supplies stainless steel tension rod and cable systems, fork ends, and point-supported curtain wall hardware in 304 and 316. If you are planning a point-fixed glass curtain wall, talk to us about load-rated components for your project.
