


 Français
 Русский
 Español
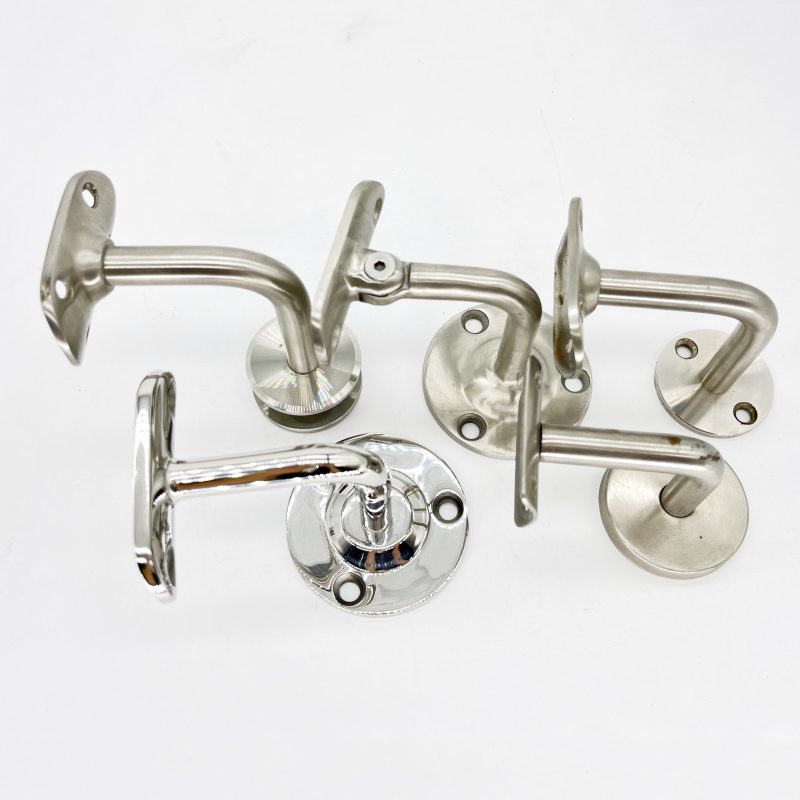
Glass railing handrail installation depends on three families of hardware: the brackets that carry the rail, the standoffs that fix the glass panels, and the spacers that keep glass and metal apart. Get the sequence right and a frameless balustrade goes up straight, passes load inspection, and stays maintenance-free for years.
A successful install is planned before the first hole is drilled. Confirm the system concept first — base fixing, glass edge support, handrail profile — because each choice changes the hardware list and the drilling pattern. Our railing & balustrade hardware range covers the brackets, standoffs, spigots and clamps used across all common systems, and our guide to choosing glass railing posts explains how post-and-panel runs differ from fully frameless ones.
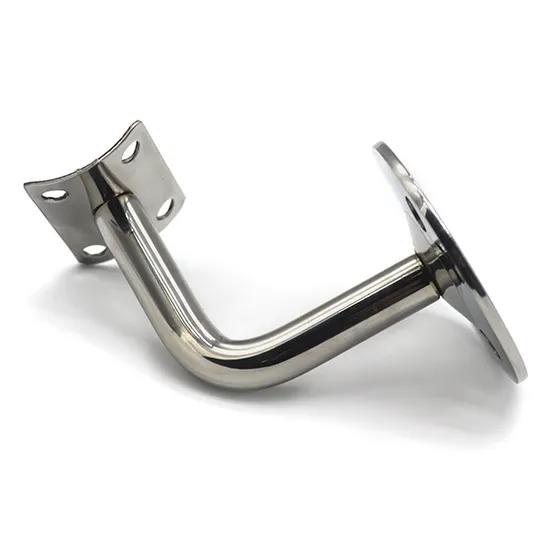
What the Hardware Does: Brackets, Standoffs and Spacers
Brackets carry the handrail. Wall-mounted brackets fix the rail to a wall or parapet; post-mounted brackets fix it to a vertical post; adjustable brackets allow the rail to follow a staircase pitch. Each type is engineered for a specific rail diameter and load path, so match the bracket to the rail profile you plan to use.
Standoffs fix the glass panel to the structure at discrete points instead of hiding it in a channel. They are through-bolted or clamped to the substrate, and a rubber collar or gasket sits between the metal body and the glass face. The visible result is the clean, floating look that makes frameless glass railings popular on balconies and terraces.
Spacers are the smaller parts that prevent metal-to-glass contact and absorb tolerance. They set the standoff distance, keep the gap between glass and structure uniform, and stop the glass edge from bearing on a hard surface — a common cause of stress cracks in poorly detailed balustrades.
Before You Start: Measurements, Substrate and Standards
Measure the full run and record panel widths, finished railing height, and the fixing surface on every support point. Check what the substrate actually is — concrete, steel or timber — because anchor selection depends on it. Expansion or chemical anchors into concrete behave differently from screws into timber, and the pull-out performance must suit the project load case.
Confirm the required railing height before ordering: finished heights typically range from about 900 mm to 1100 mm depending on application and local code, with exterior and high-traffic areas usually demanding more. For balconies and stairs exposed to wind, also confirm the design barrier load with the engineer — the hardware and glass spec must be sized to it, using the supplier’s load data as the reference.
Step-by-Step: Fitting Brackets, Standoffs and Spacers
Follow this sequence on site and the whole run stays aligned from first fixing to final torque:
- Mark out the run. Set out centre lines for base fixings and handrail brackets, checking them against panel widths and joint positions before drilling anything.
- Establish levels. Use a laser level for horizontal runs and a string line for stairs, and mark every fixing point against that reference.
- Drill and set anchors. Drill to the diameter and depth specified by the anchor supplier, clean the holes, and set expansion or chemical anchors. Edge distances and tightening values come from the anchor product data — never guess them.
- Mount base hardware. Bed spigots or base channels in place and align the line of fixings before final tightening.
- Fit standoffs and spacers. Mount the standoff bodies with their rubber collars, leaving clearance for adjustment; fit spacers wherever glass can touch metal.
- Install the glass. Lower panels onto setting blocks or neoprene pads so glass never bears directly on metal, and check each panel for plumb before moving on.
- Secure the top edge. Fit edge clamps or top channels, then mount the handrail brackets at the marked positions.
- Tighten in sequence. Hand-tighten the full run, re-check alignment, then torque every fixing to the supplier’s specified value. Over-torquing a standoff can crack the glass; under-torquing leaves the panel loose under load.
Browse the railing & balustrade hardware range to build a complete fixing set for your next project — or contact our team for a hardware schedule against your drawings.
Positioning and Alignment: Tolerances That Matter
Glass panels are manufactured to tight tolerances, but structures are not. The spacers and adjustable fixings exist to absorb that difference: use them to square panels, equalise edge gaps, and keep the top line true. As a rule of thumb, aim for a uniform gap between panels and a plumb edge within a few millimetres over the panel height — exact acceptance values follow the project spec.
Leave allowance for thermal movement at joints and at the ends of long runs, especially outdoors where surface temperature swings are large. A continuous line of glass locked rigidly at both ends is a common source of later cracking and seal failure.
Common Installation Mistakes to Avoid
- Drilling before checking the substrate — an anchor specified for concrete will not hold in a thin screed or hollow block.
- Letting glass touch metal without rubber — every contact point needs a gasket, spacer or setting pad.
- Over-torquing standoffs and clamps — follow the supplier’s torque values, not feel.
- Tightening before the run is level — corrections after final torque are expensive.
- Ignoring expansion gaps on long exterior runs.
- Using the wrong stainless grade in coastal or pool environments — confirm material grade with the hardware supplier for corrosive sites.
Glass Railing Handrail Installation FAQ
What spacing should I use between standoffs? Spacing follows the glass panel width and the design load case. Typical point-fixing patterns are defined by the engineer or the hardware supplier, so confirm the fixing pattern against your project’s wind load and barrier load calculations before ordering.
Can brackets be adjusted after the glass is fitted? Adjustable brackets allow fine tuning of rail height and pitch within their design range. Major corrections — different pitch or wrong bracket position — mean re-drilling, so check positions carefully before anchors are set.
What type of glass is used for glass railings? Tempered or laminated safety glass, typically between about 10 mm and 19 mm depending on span and load. Confirm the panel spec with your glass supplier and the project engineer.
Do I really need rubber spacers everywhere? Yes at every glass-to-metal contact point. Rubber collars, gaskets and setting pads spread the load, prevent stress concentration, and stop moisture from sitting between glass and metal.
Which stainless steel grade should the hardware be? 304 stainless covers most inland projects; 316 is the safer choice for coastal sites, pools and chemically aggressive environments. The supplier’s grade data should match the project environment.
How do I know the fixing is torqued correctly? Use a torque wrench and the hardware supplier’s torque specification. Correct torque keeps the panel secure without risking glass damage — it is one of the few steps on site that should never be estimated.
Once the run is torqued and aligned, periodic upkeep keeps it secure; see our glass railing hardware maintenance guide for inspection intervals and care steps.
Ready to specify? Send us your drawings and we will put together a hardware schedule with brackets, standoffs and spacers sized for your system — get a quotation from Trilonum.
For railing runs without handrails, our comparison of frameless glass railing U-channel vs clamp systems shows how the base fixing changes.
